This map provides an up-to-date search for service listings across Toronto, including food banks, meal delivery services, community health services and more. It also provides the search capability to find the nearest Assessment Centre Location, Pharmacy COVID-19 Testing Site, Immunization Clinic or Hospital.

The COVID-19 Resources Near Me tool allows you to enter a location and create a buffer area around the location. All the COVID-19 Resources found within the buffer distance will be listed in the menu (by default the buffer distance is 5km).

  • Select the COVID-19 Resources Near Me tool
    Display of the COVID-19 Resources Near Me menu.
  • Enter the location in the Search box and press the ENTER key. This can be an address (i.e. 55 John St.), an intersection (i.e. Yonge and Bloor) or a place name (i.e. City Hall). Alternatively use the “Current Location” button to set the location or select a location on the map.
    Display of search bar with "City Hall" typed in and a list of resulting type-ahead possibilities include City Hall in Mississauga and other places.

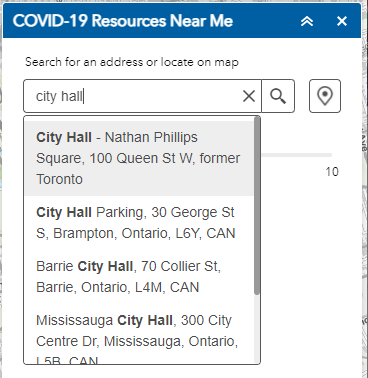
The map centres and zooms to the selected location.

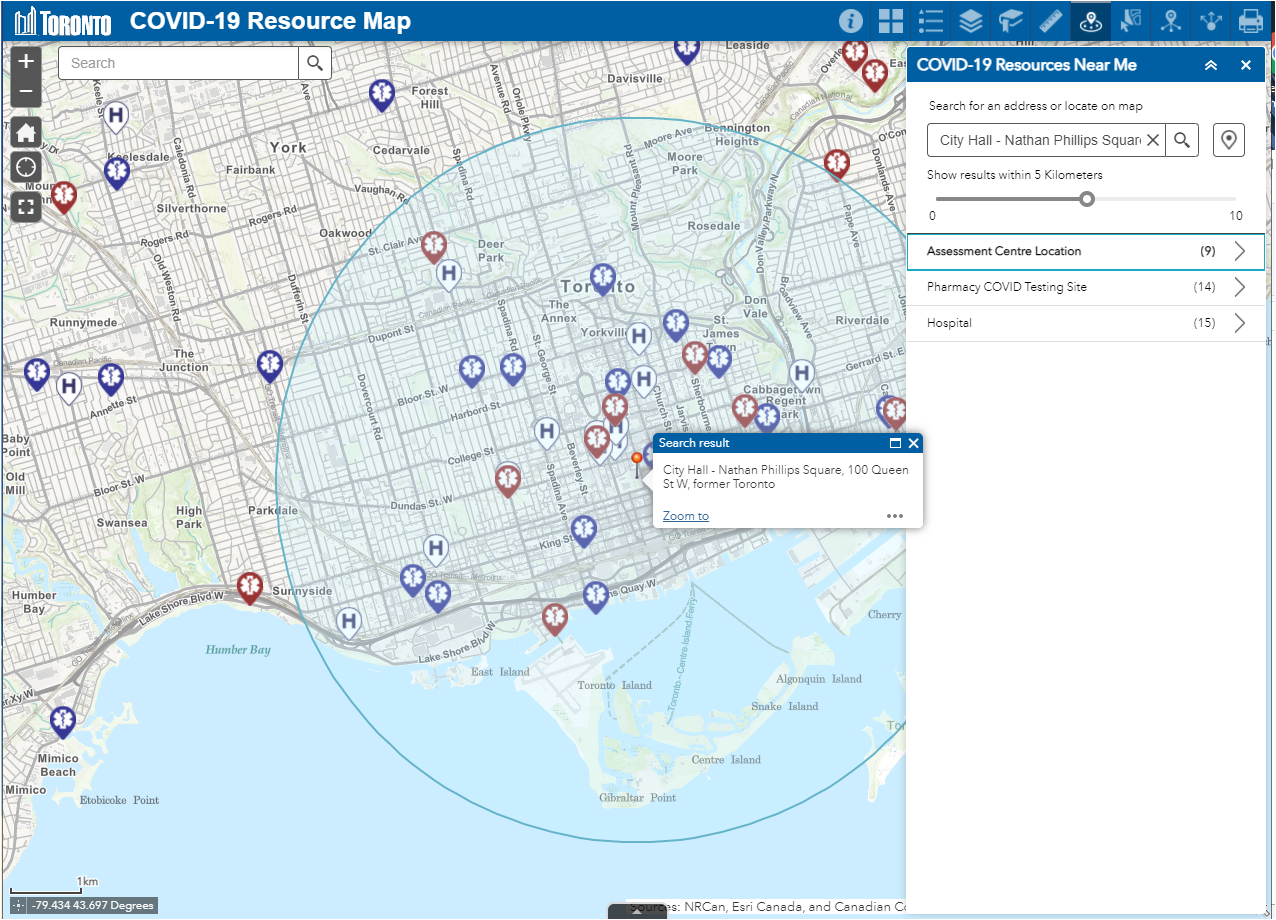
A buffered circle will draw on the map and all COVID-19 Resources that fall within this circle (5 km by default) will be listed in the menu, including:

  • Assessment Centre Location
  • Pharmacy COVID Testing Sites
  • Hospitals

For each category, there is a count of the number of features. (i.e. there are 9 Assessment Centre Locations within the buffer)

Display of Map zoomed to City Hall with a buffer circle around it for 5 km in all directions - as well show the COVID-19 Resources Near Me menu with the number of Assessment Centre locations that fall within the buffer showing (9) - same for COVID testing sites(14) and Hospital.(15)

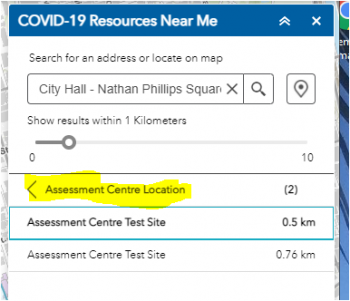
You can limit the search results by moving the slider bar on the menu – here it is reduced to 1 Kilometer and the smaller circle now only show 2 Assessment Centre locations.

Display of Map zoomed to City Hall with a buffer circle around it for 1 km in all directions - as well show the COVID-19 Resources Near Me menu with the number of Assessment Centre locations that fall within the buffer showing (2) - same for COVID testing sites(2) and Hospital(2)

Click on Assessment Centre Location and the two that fall within the buffer distance are shown.

Display of the COVID-19 Resources Near Me menu with 2 Assessment Centres listed that fall within the buffer distance.

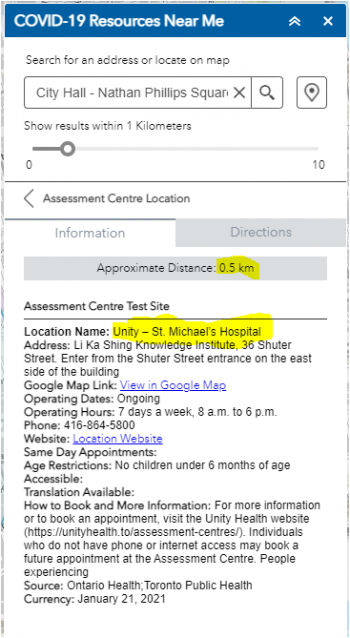
Click on the first item in the list and detailed information for this location is displayed in the menu.

Display of the COVID-19 Resources Near Me menu with the details of the selected Assessment Centres listed

Click on the Directions tab to see turn by turn directions of how to get to this location displayed in the menu.

Display of turn by turn directions to the selected Assessment Centre

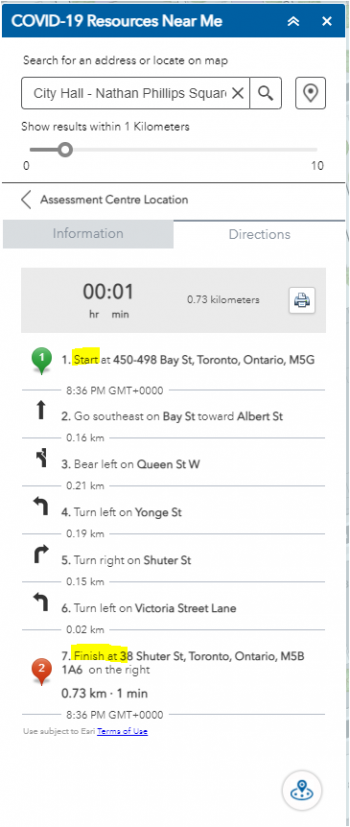
The route is also displayed on the map.

Tip: click on the minimize button at the top of the menu to collapse the menu, showing the entire route on the map.

Display of the map with the route displayed to the selected Assessment Centre

Optionally you can click on the Search Nearby button at the lower right of the menu to centre the buffer on the selected feature.

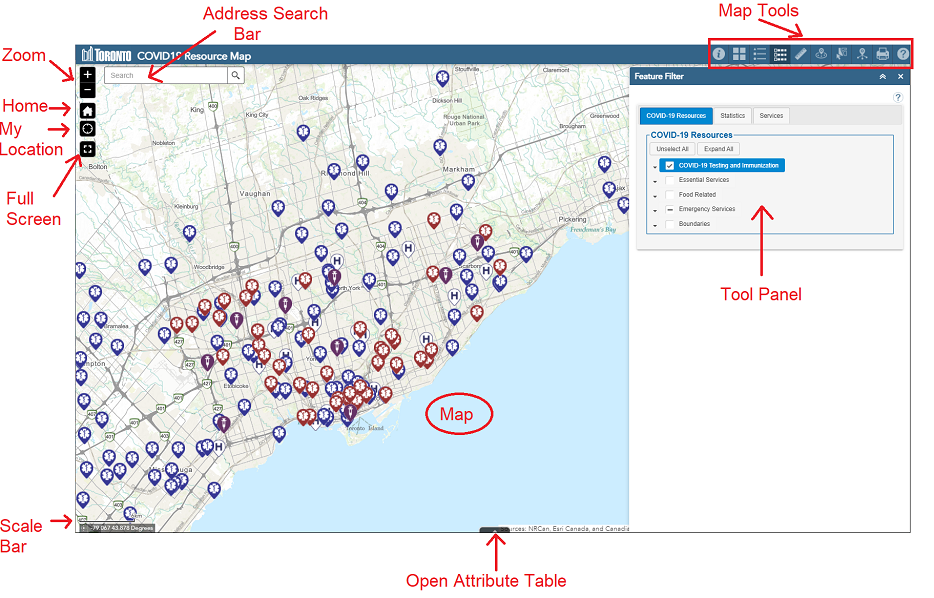
When you first bring up the COVID-19 Resource Map, it displays a map of the entire city and its surrounding area. The COVID-19 Resource Map is comprised of the following components, identified on the image below: Map Tools, Zoom Tools, Tool Panel, Address Search Bar, and the main Map window.


Detailed map showing the different parts of the map face including the Map Tools, Zoom Tools, Tool Panel, Address Search Bar, and the main Map window.


  1. About icon About: Provides general information on the COVID-19 Resource Map application, including contact information.
  2. Basemap Gallery icon Basemap Gallery: The Covid-19 Resource Map can have a street map or imagery for its background. You may choose the background from the Basemap Gallery.
  3. Legend icon Legend: Displays labels and symbols for layers in the map that are selected in the Feature Filter menu.
  4. Feature Filter icon Feature Filter: You may choose to display additional information on the map using the Feature Filter. You can select one or more layers to display on the map. This tool is selected at start-up.
  5. Measurement icon Measurement: Set of measurement tools such as measuring an area, measuring a line, and locating a point.
  6. Near Me icon Covid-19 Resources Near Me: Allows you to pin a location on the map and set a buffer around the pin. The tool shows a list of the selected features within the buffer range and provides turn by turn directions to the selected feature.
  7. Select icon Select: Allows you to select features by drawing a polygon on the map. Selected features can then be compared, exported or printed.
  8.  Info Summary: Displays a count for features visible in the map and provides an alphabetical listing of the feature names.
  9. Print icon Print: This feature allows you to create printouts choosing from a variety of layouts and formats.
  10. Help icon User Guide: opens this help file.

The COVID-19 Resources Map can have a street map or an aerial photography for its background. You may choose the background by clicking:

  1. The Basemap Gallery button
  2. And then select from the list (i.e. Imagery with Labels)

Basemap Gallery displaying all available basemaps

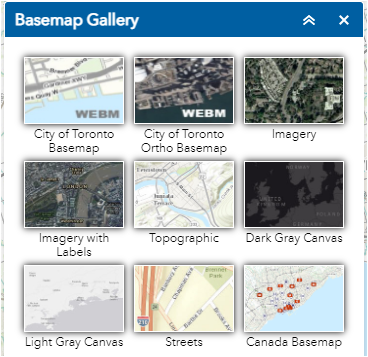
The background of the map updates to the selected basemap (Imagery with Labels)

COVID-19 Map Map displayed with Imagery as the basemap

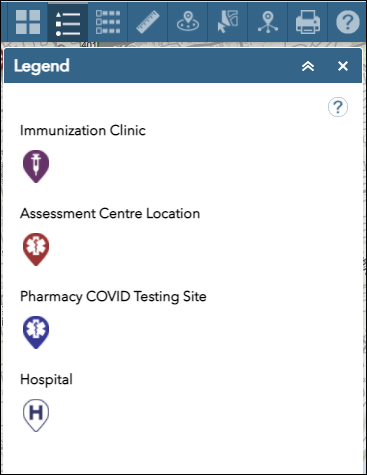
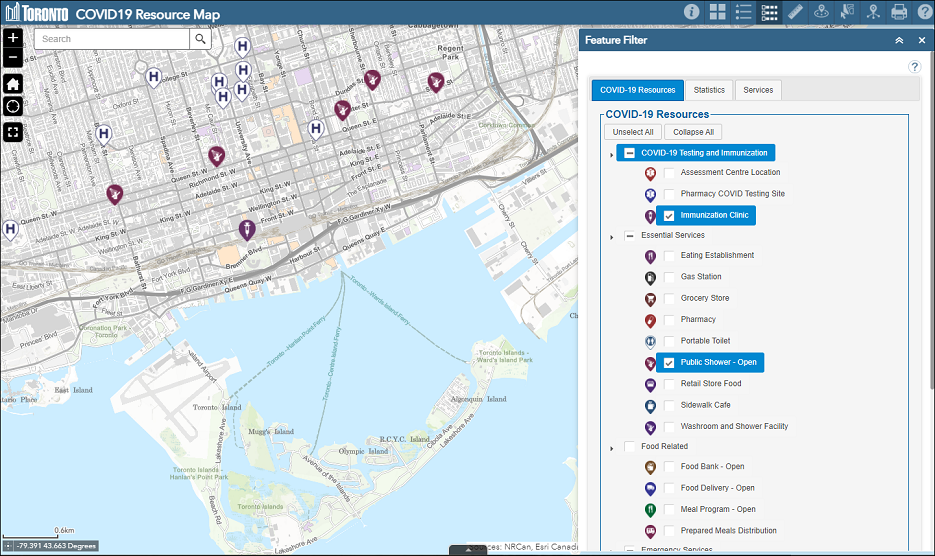
The Legend tool displays the legend information for all of the layers that have been selected in the Feature Filter tool. By default the legend shows

  • Immunization Clinic
  • Assessment Centre Location
  • Pharmacy COVID Testing Sites
  • Hospital


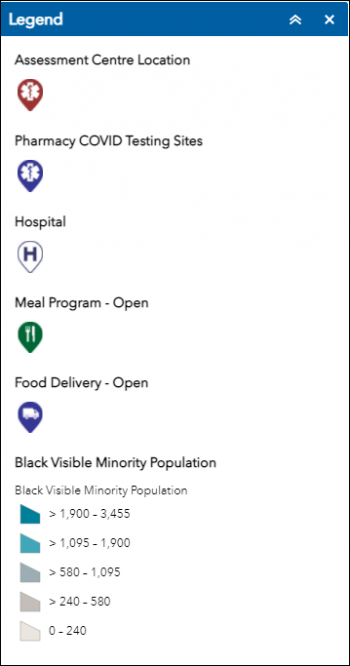
If you have selected to display additional layers using the Feature Filter tool, these additional layers will be displayed in the Legend menu.

Display of legend showing names of layers and associated icons with additional layers added

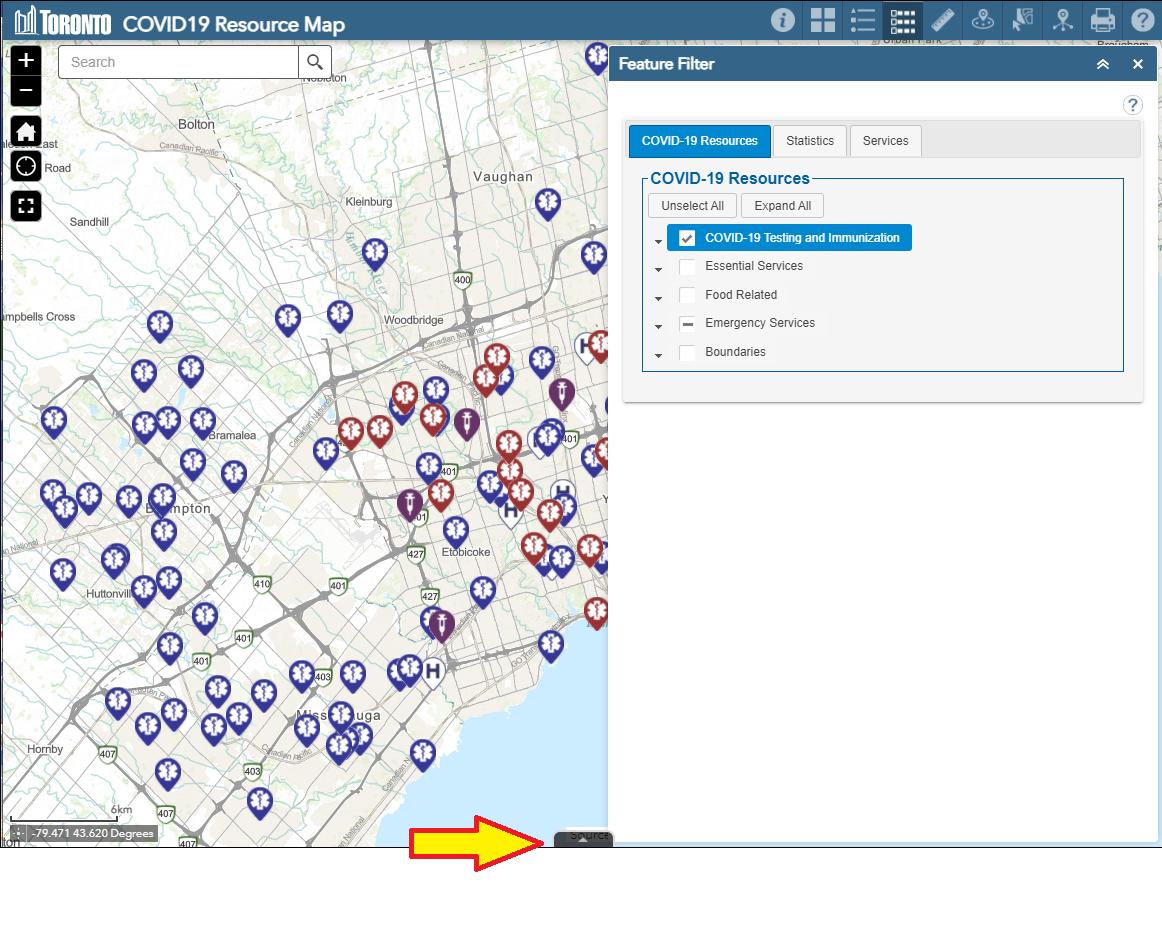
The Feature Filter allows you to check on and off layers on the map. It is also the place where you find the legend with names and symbols for all features. Map Layers are organized according to type and shown in separate tabs.

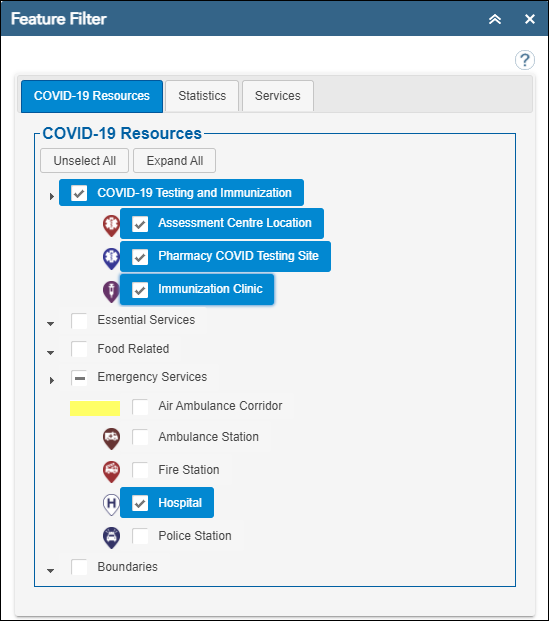
Click on the different tabs (COVID-19 Resources, Statistics, Services) to access other layers that can be drawn on the map. You can choose to select a group of layers or individual layers. As well there are buttons to Unselect All layers from a tab or to Expand All to see all layers in the tab.

Layers will be greyed out if they aren’t available at the current zoom level of the map.

Once you zoom in on the map using the zoom tools or by mouse these layers will now be available for selection.

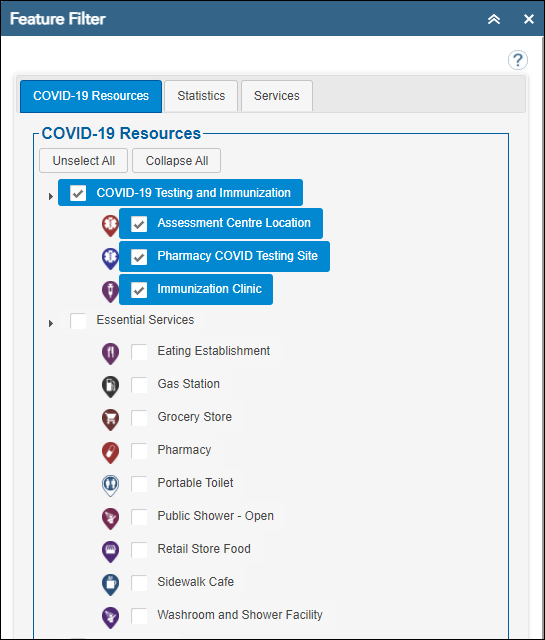
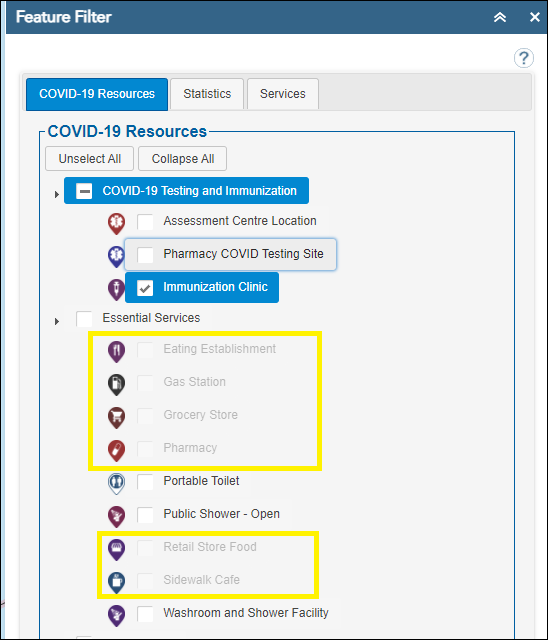
Try clicking on the Public Shower – Open layer to draw this layer on the map.

Measuring an Area

User will draw a polygon inside the map window and the area of the polygon will be calculated and its result will be shown inside the Measurement panel.

Display of Measurement tool for area measurement with numbers depicting the steps required to display an area measurement

  1. Select the Measurement tool.
  2. Select the Area icon.
  3. Click on the map to start measurement.
  4. Click the next vertex of the polygon.
  5. Click additional vertices of the polygon.
  6. Double click the last vertex to finish drawing.
  7. Read the Measurement result.

Measuring a Line

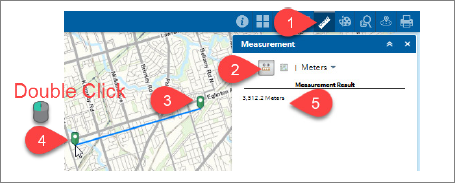
User will draw a line (or polyline) inside the map window and the length of the line will be calculated and its result will be shown inside the Measurement panel.

Display of Measurement tool for line measurement with numbers depicting the steps required to display an line measurement

  1. Select the Measurement tool.
  2. Select the Distance icon.
  3. Click the first point on the map.
  4. Double click the last point of the segment (note you can click other points to measure multiple segments).
  5. Read the Measurement result.

Locating a Point

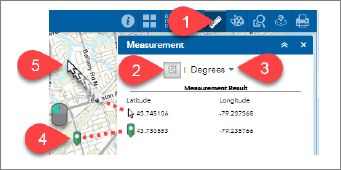
User will draw a point inside the map window and the x and y of the point will be calculated and its result will be shown inside the Measurement panel.

Display of Measurement tool for location to depict the lat/long of a location on the map

  1. Select the Measurement tool.
  2. Select the Location icon.
  3. Select the coordinate format (Degrees or DMS – Degrees Minutes Seconds).
  4. Click a point on the map (coordinates will be displayed next the green pin icon).
  5. Moving your mouse on the map will show the coordinates of the location where you are pointing next to the arrow icon.
  1. Choose the Select tool.
  2. Click on the layer(s) that you wish to select from (only those layers that have been turned on in the Feature Filter menu will be visible). See screenshot below.
    Display of the default Select Menu listing Assessment Centre Location, Pharmacy COVID Testing Sites, Hospital
  3. Select Features on the map by clicking and pulling the mouse
    Display of the Map with the select tool results of clicking the mouse and dragging the mouse to includes a selection area.
  4. The number of features selected is displayed in the Select menu.
    Display of the Select Menu listing Assessment Centre Location, Pharmacy COVID Testing Sites, Hospital along with number of selected features for each layer.
  5. Select the “…” button to access additional tools
    Display of the Selection Actions menu with "View in Attribute Table" highlighted.

The selected features are displayed in the attribute table below the map.

Display of the Attribute table with the detailed column values for Assessment Centres highlighted.

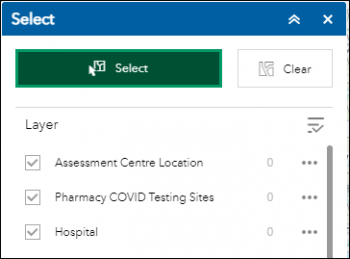
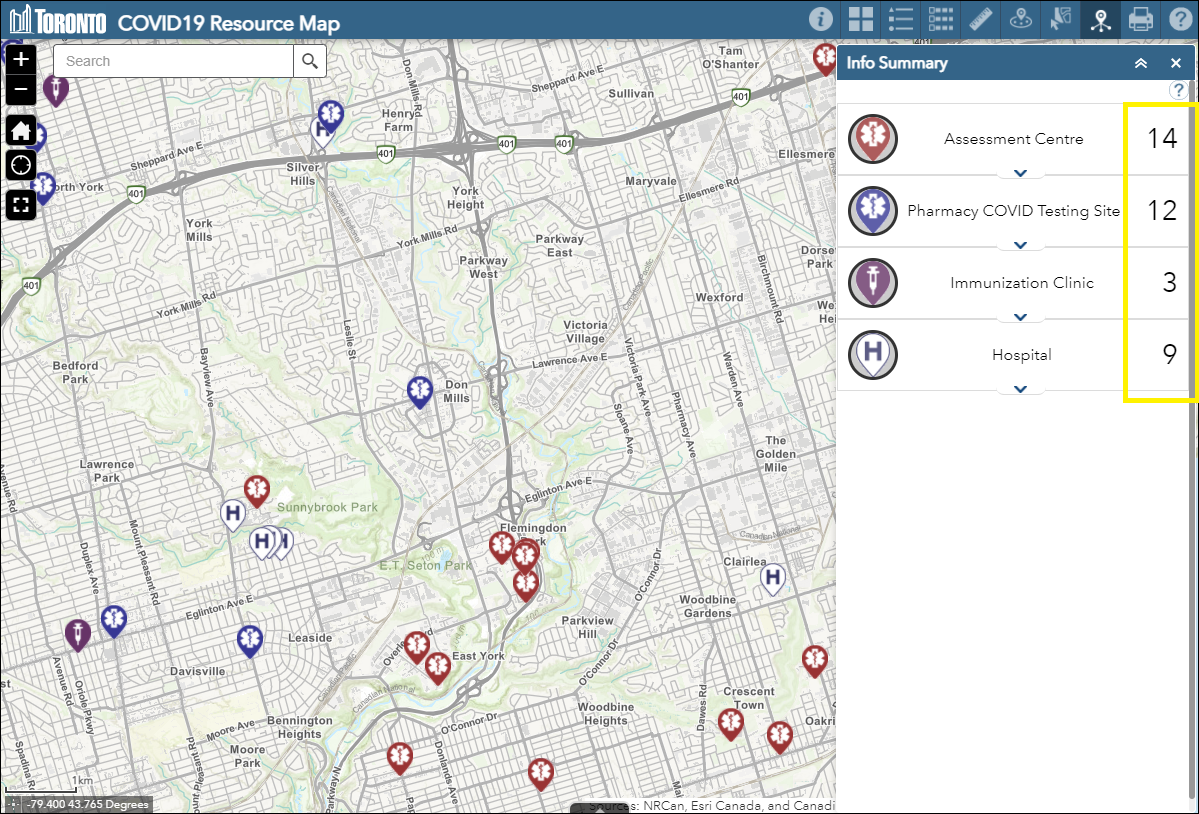
The Info Summary tool provides a count of features in the current map extent for each layer specified.


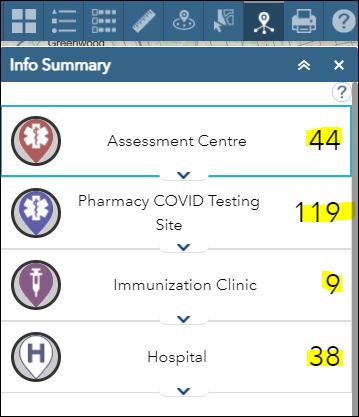
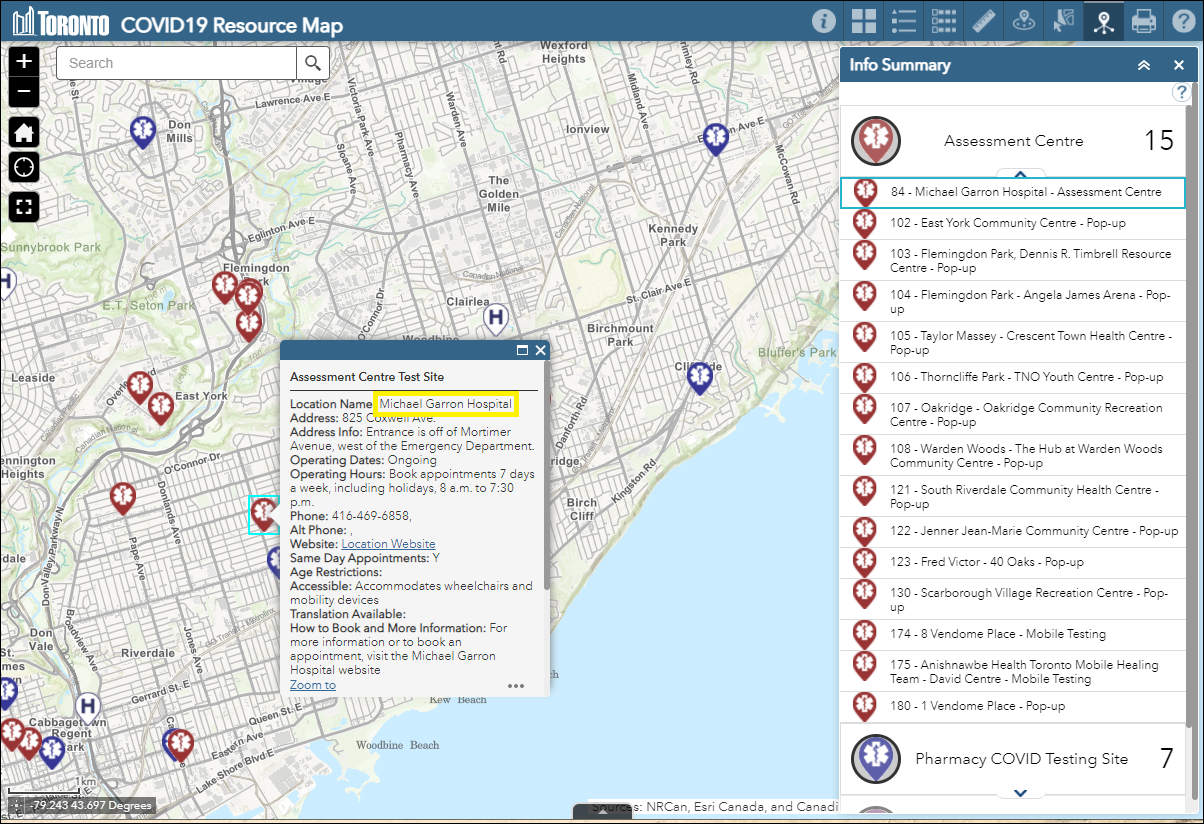
Each layer in the menu can be expanded to show a list of features in the current extent.

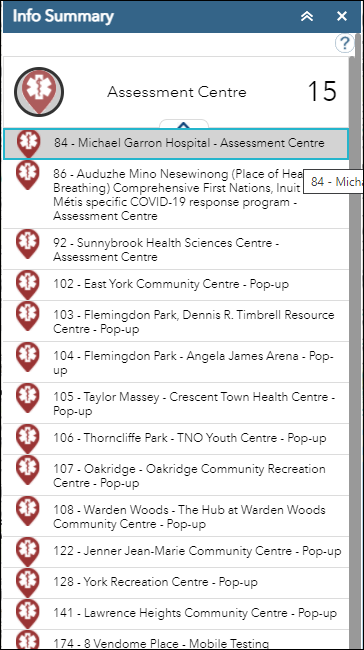
Clicking on one of the locations in the menu list highlights that location on the map and the details for that location are displayed in a popup menu.

Note: that the counts for each layer update as the map extent changes as you zoom and pan the map.

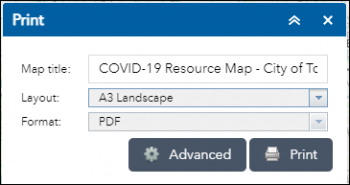
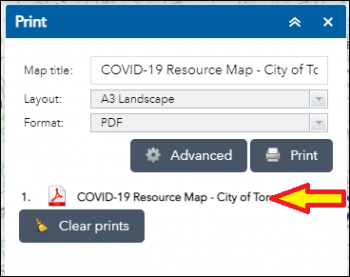
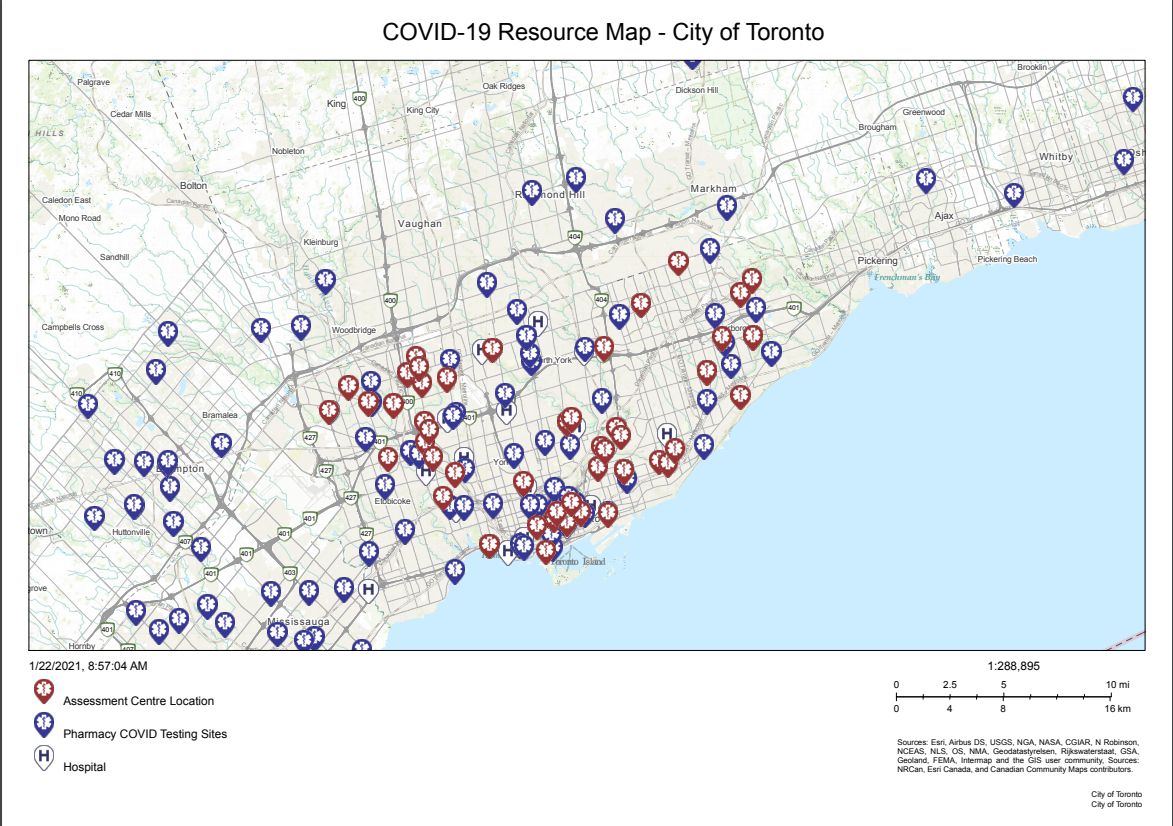
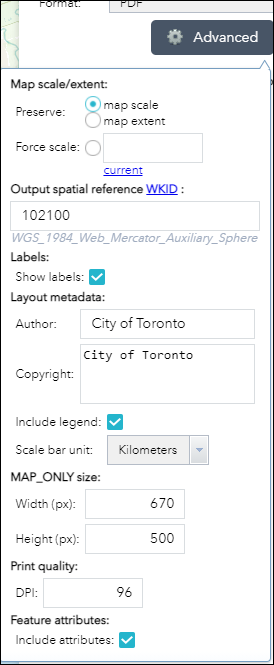
Print allows you to export the current view of the map in different formats (e.g. PDF, PNG etc.…). The printout will also include all selected features, drawings, a title, and the legend.

To print your map:

  1. Select the Print tool
    Display of the default print Menu showing Map Title (COVID-19 Resources Map), Layout(A4) and Format(pdf)
  2. Optionally change the Map title
  3. Click the Print button
    Display of the default print Menu showing Map Title (COVID-19 Resources Map), Layout(A4) and Format(pdf)
  4. Double Click on the new print document in the list to preview.
    Display of the print Menu - preview of the print.
  5. Optionally, Click the drop-down button in the Layout field, and select the Layout from the list (e.g. A4 Landscape)
  6. Optionally, click on the drop-down button in the Format field, and select the Format from the list (e.g. PDF)
  7. Optionally, Click the Advanced button to customize Map Author and Copyright text
    Display of the print Menu - Advanced menu where the user can change Title, Layout and other features.

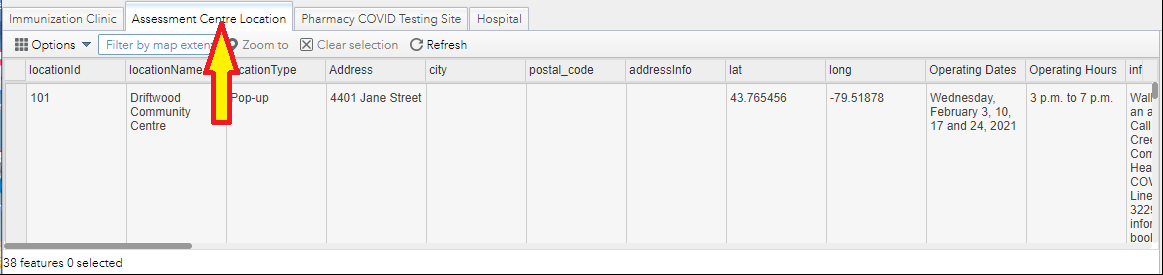
Click on the Open Attribute Table button at the bottom of the map to display detailed tabular information for layers displayed on the map.

Display of the map with an arrow pointing at the "Open Attribute Table" button at the bottom of the map

The attribute information is displayed in table form with the attributes for the first layer displayed (Immunization Clinic)

Attribute table shown with the tab "Immunization Clinic" selected

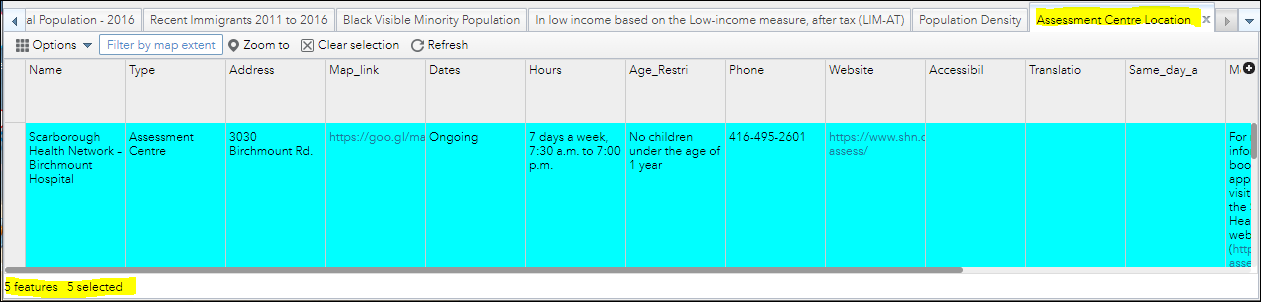
Click on the second tab in order to see the attributes for the second layer (i.e. Assessment Centre Location)

Attribute table shown with the second tab "Assessment Centre Locations" selected

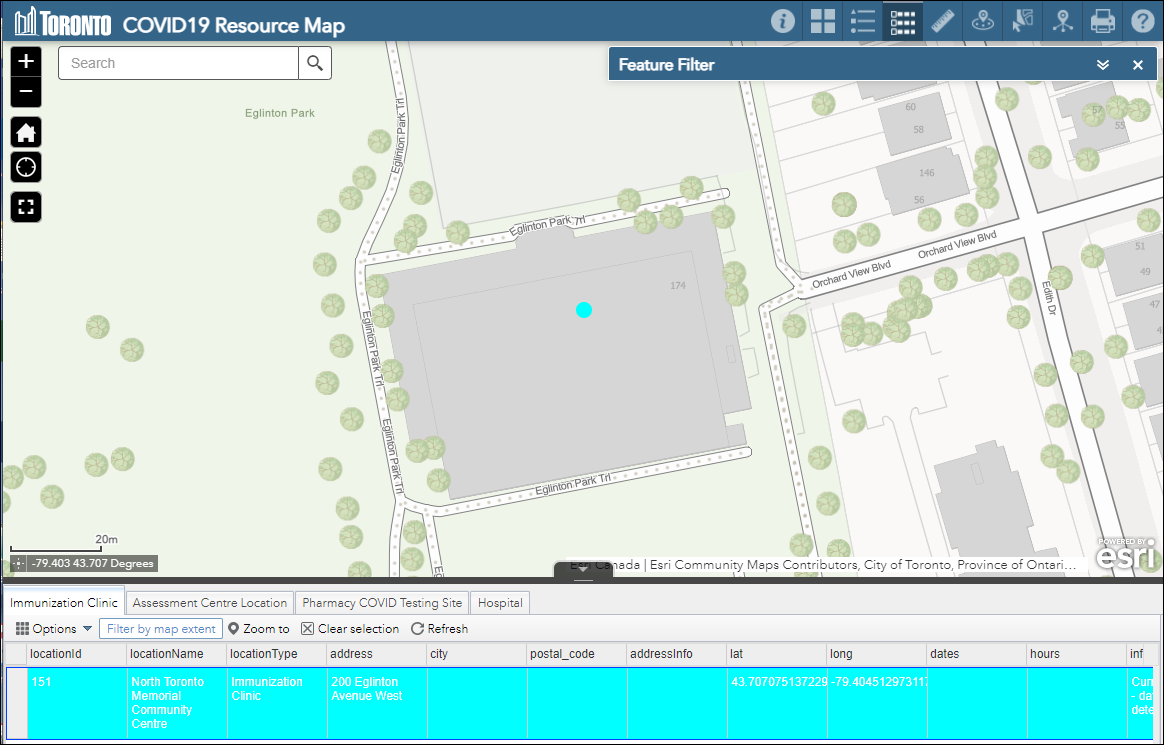
Select one of the records by clicking in the left-most column of the attribute table, this highlights the record in the table and on the map.

Attribute table show with one record highlighted

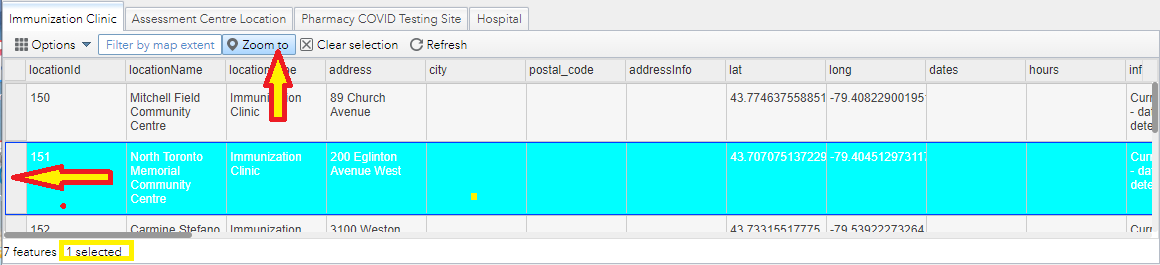
Select the Zoom to button to zoom to the selected feature on the map.

Display of the map zoomed in to the feature selected in the attribute table

Filter layer based on attribute value

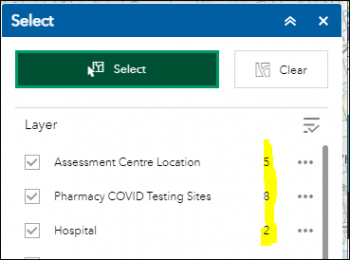
Click the Filter by Map Extent button. This selects all features in the layer and the total count of features is shown at the bottom of the menu. (i.e. 51 Features)

Attribute table shown with an arrow pointing at "Filter by map extent" and the number of features selected shown at the bottom of the men (51 features)

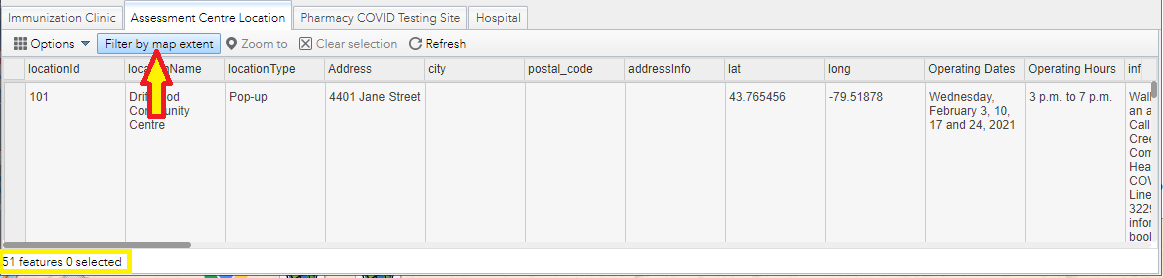
Select the Options button and select Filter.
Select an attribute value from the pulldown list (i.e. LocationType) and type in the Search value (i.e. Pop-up).

Filter popup shown with "locationType is Pop-up" selected in the drop down menus.

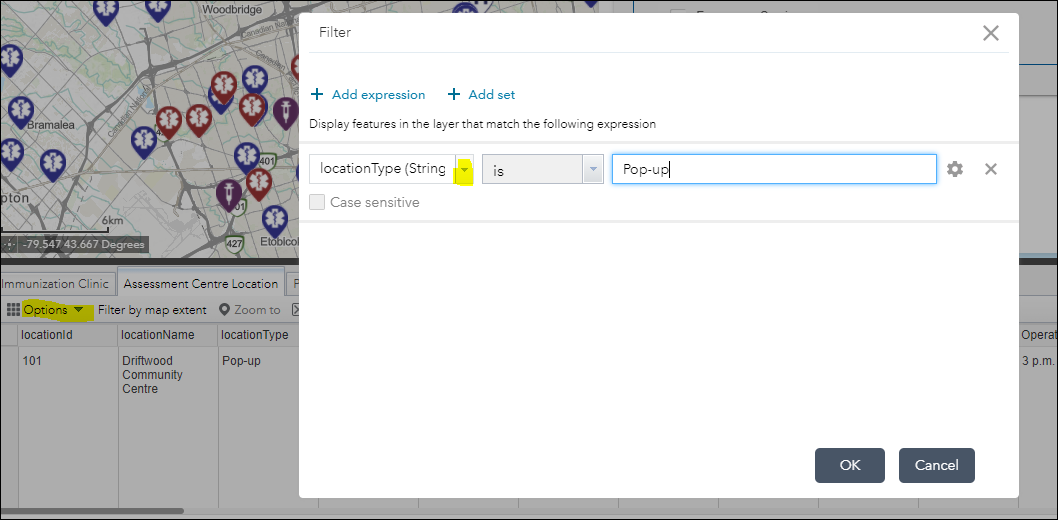
Click on the OK button.

The filter is applied to the attribute table and the map display. 24 of 51 features where (locationType = Pop-up) are displayed.

Attribute table shown with only Pop-up Assessment Centre locations shown (24 features)

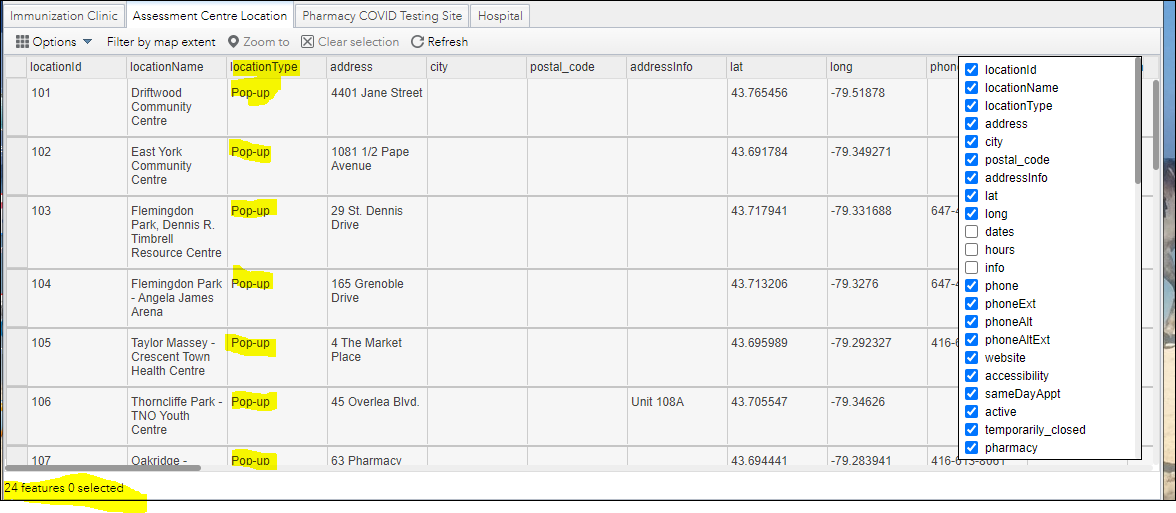
Optionally you can Click Options and Show/Hide Columns to limit the columns of information shown in the attribute table.

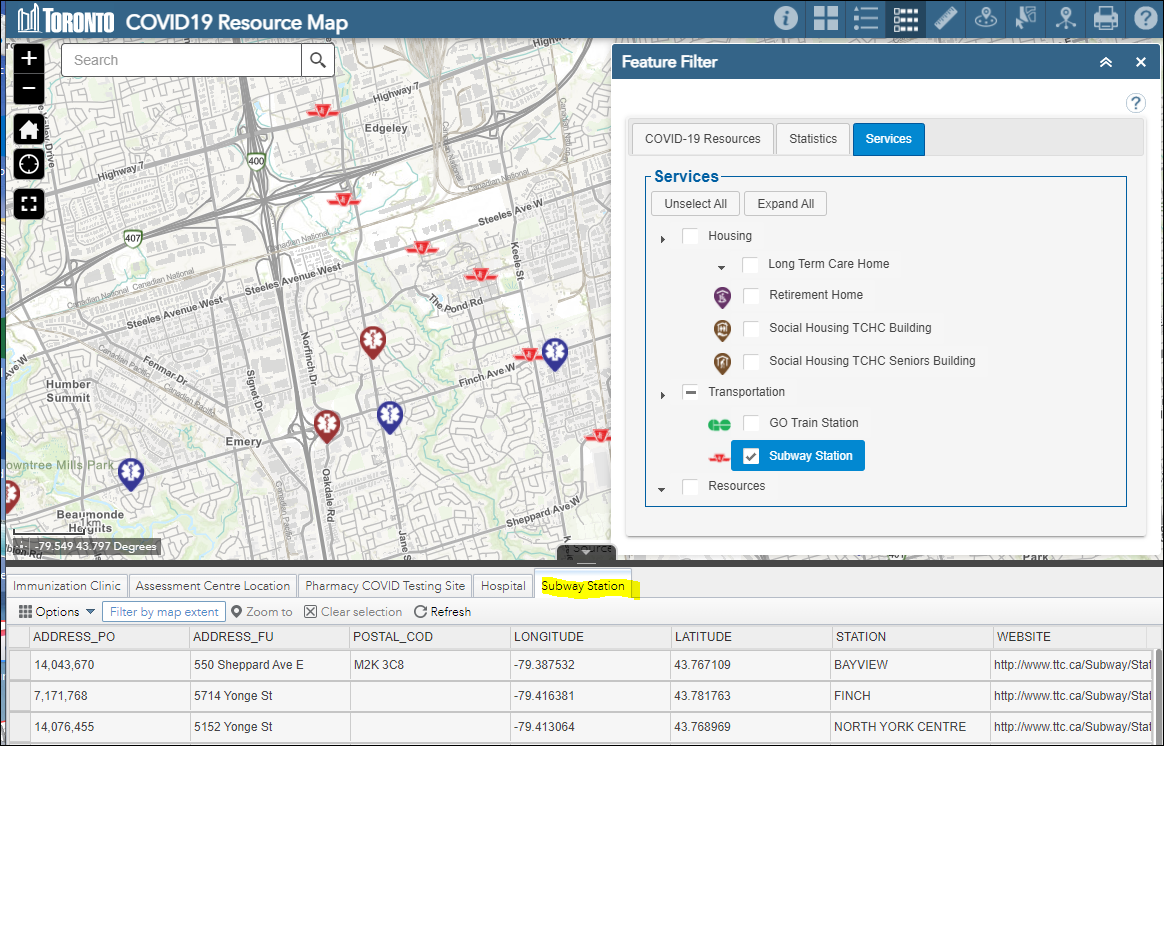
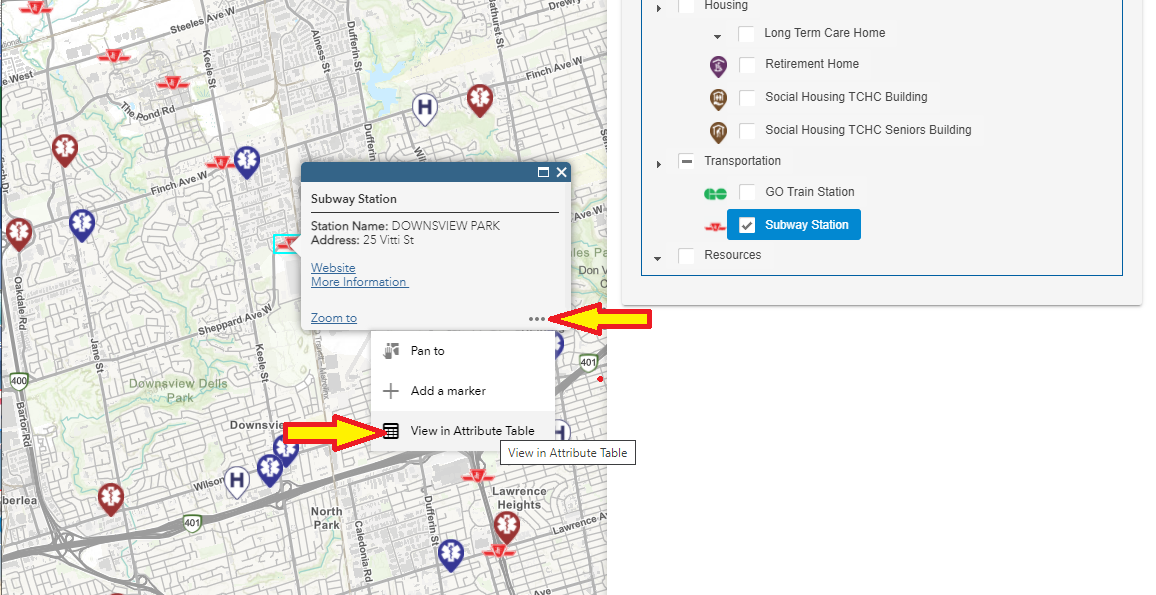
When you add an additional layer to the map using the Feature Filter tool they will be displayed in the attribute table showing an additional tab (i.e. Subway Station)

Display of map and Feature Filter menu with Subway Station selected and drawn and an addition column "Subway Stop " shown in the attribute table

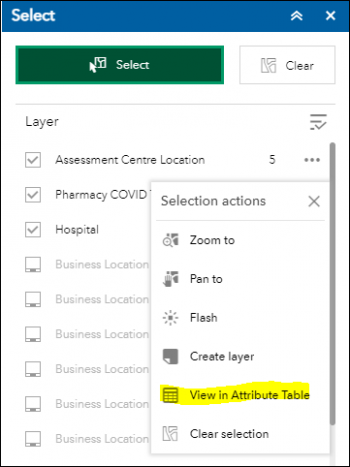
Alternatively, you can display a layer’s attributes by selecting the ellipses “…” button and View in Attribute Table from the popup menu for each layer.

Display of the map with the popup for Subway Stop shown and the elipse (…) menu selected and the "View in Attribute Table " option selected

The City of Toronto COVID-19 Resource Map is a mapping tool created by a collaboration of the

  • EOC – Emergency Operations Centre
  • SDFA – Social Development, Finance & Administration
  • GCC – Geospatial Competency Centre
  • TPH – Toronto Public Health